Friday 31 December 2021

Getting a head start for next Christmas

I have been working frantically to get this year's Christmas cards done. I created quite a few quick cards using elements from my UFO box. In fact, I ended up with a few extras that can go on my pile for next year. Today's cards fall in that category.

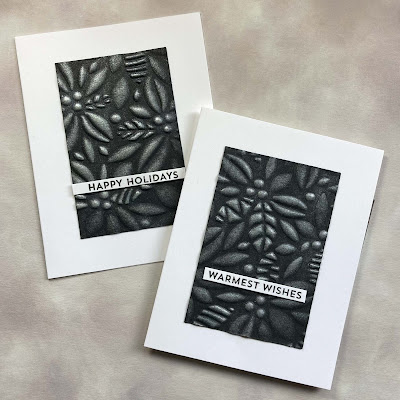
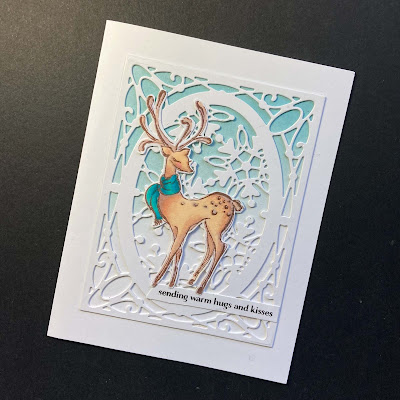
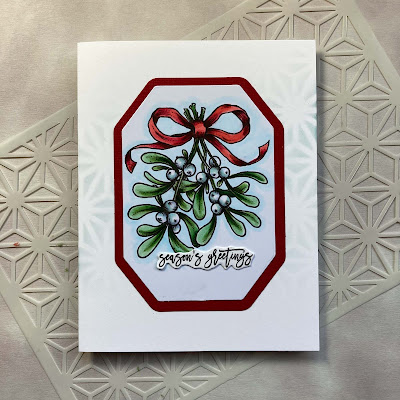
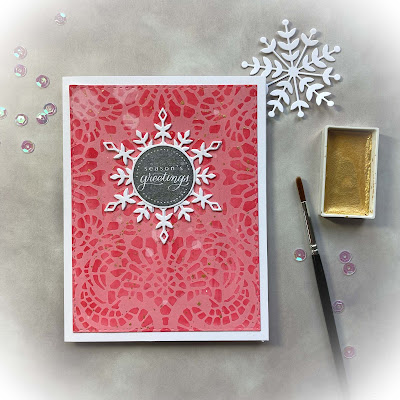
I created the panel for these two cards during the Eat Sleep Crafty Retreat back in June using a 3D embossing folder (5x7 Retro Poinsettia, Sue Wilson/Creative Expressions) and black cardstock. Next, I swiped my Versamark ink pad over the raised areas and applied Perfect Pearls.

I could and should have turned the panel into cards back in July for Let's squash it challenge no. 10 Shimmer and Shine but was only just getting back to crafting. But hey, I did get the cards ready to link it up for the current challenge, Let's squash it no. 15 Your call.

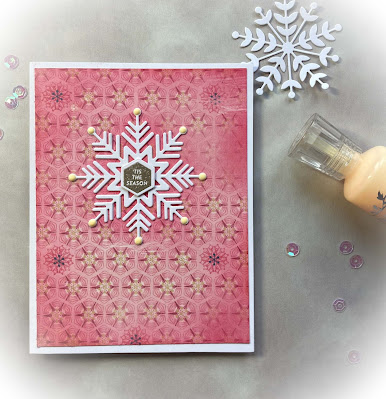
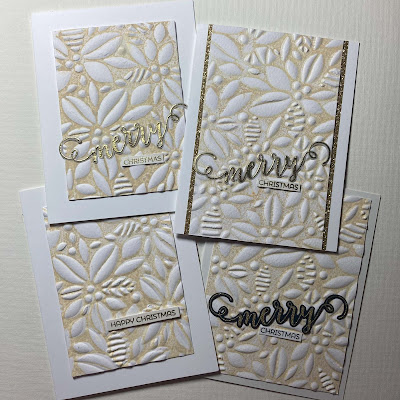
Last year, I also used this EF to create a few last-minute cards, but I never posted them on my blog, so here goes. For these cards, I inked up the embossing folding before running it with the cardstock through my die-cutting machine.

I'm also linking up my 2 cards at:

Merry Little Christmas - #41 Anything Christmas

STAMPlorations CAS - Anything CAS goes


12 Months of Christmas - #84 Anything goes Christmas

I want to thank all of my followers and visitors for visiting my blog and commenting, and I wish you all a very happy, healthy and creative New Year!


Thursday 2 December 2021

November card chain reveal

Hello everyone. It's time to reveal the cards that were exchanged this month for the Card Chain Challenge. My card went to Joanne in the UK.


As always, there are different options offered for inspiration. These were the options for November:

Colour Palette Option

or

Sketch Option

or 

Theme Options: Snowflakes/Polar Animals/Friendship

or 

Product / Technique Options: Book Paper/Pop Up


As you can see, I loosely followed the sketch and combined all of the theme options.


Tuesday 30 November 2021

Mistletoe

Hello everyone. I'm popping in for a quick post with this mistletoe card. 

I found this image in my UFO box. I think it was a freebie that I coloured in several years ago. All I needed to do now was add more shading with my Copics and coloured pencils and die cutting it into a panel with a red mat behind it. The sentiment (Winnie & Walter) was stamped in black Versafine and fussy cut.

To add a little more interest to the background, I did some very light ink blending over an old stencil using Speckled egg distress ink.

I'm linking up my card at:

Beccy's Month of Holiday Cards - M for mistletoe

SSS Wednesday - Anything goes


Uniko challenge - #68 Celebrate (optional: reds & greens)


Monday 29 November 2021

Rainbow trees

Hello everyone. As soon as I saw the card that Laura Bassen created for the recent Holiday Workshop class at Online Card Classes, I knew I wanted to use her idea and technique with my Tim Holtz stencil. As always, this class was filled with inspiration, but I have only managed to create this one card so far.

I used Catherine Pooler inks and blending brushes to do my rainbow ink blending. I white heat embossed this beautiful bold sentiment (Festive Cheer, Penny Black), trimmed & fussy cut it out and mounted it to my panel using thin foam tape. To finish off, I added a few clear drops.

I'm linking up my card at:

Beccy's Month of Holiday Cards - R for rainbow

STAMPlorations Stencil - Anything goes with a stencil


SSS Wednesday - Anything goes

HLS Stencil - Anything goes with a stencil


ATCAS - #211 Colourful
Please ignore my card if there is not enough 
white space to still be considered CAS

Dutch Card Lovers - #353 Kerstkaart in niet-traditionele kleuren 
(a Christmas card using non-traditional colours)

ATSM - #419 Any occasion


Sunday 28 November 2021

Scenic Christmas stamping

Hello everyone. I am working frantically to get my Christmas cards done so that I can post them in time to hopefully reach our family and friends before December, 25th. That also means I'm hoping to post frequently fast this upcoming week.

Anyway, the panel for today's card was mostly created during Laurel Beard's scenic stamping class at the Eat Sleep Crafty Retreat back in June, but I was struggling a little on how to turn it into a card. I did not like the sky, which was all white, so I decided to add a light wash using a pale blue ink and a large brush and lots of water. I also added a few snowy banks before adding the panel to my card base with a green strip of cardstock behind, much like my cocoa card from a previous post.


I'm linking up my card at:

Beccy's Month of Holiday Cards - S for scenic stamping, snow

SSS Wednesday - Anything goes

NBUS - #31 My NBUS item is this beautiful Penny Black stamp


Stamping Sensations - Christmas

We Love Stamping - Christmas

Allsorts - #652 Use a hand-stamped or digital image


Saturday 27 November 2021

Holly stencil revisited

Hi everyone. I created another background using the holly stencil of a previous post, but this time I stuck to more traditional colours. 

I'm linking up my card at:

Beccy's Month of Holiday Cards - Casing myself

STAMPlorations Stencil - Anything goes with a stencil


SSS Wednesday - Anything goes

HLS Stencil - Anything goes with a stencil


Saturday 20 November 2021

Co-Coa-Co

Hello everyone. I'm back with one last card for the current Coffee Lovers Blog Hop. 

And here's a close-up of the foiling:

For this one, I stamped this sweet and festive cup stamp from Daisy Mae Designs (The Snowman and the Teacup) and coloured it using Copic markers. After having played with different ways of foiling last weekend during the Eat Sleep Crafty Retreat, I decided to add gold foil to the polka dots and rim on the cup by applying liquid glue (Tombow mono multi) using a toothpick and applying the gold foil once the glue had dried but was still tacky.

I added a sentiment from my NBUS Caffeinated Christmas stamp set designed by Becca Cruger for STAMPlorations and die cut my panel using a double stitched CUTplorations die. To break up all the white, I added a snippet of green cardstock to my card base before adhering my panel.


We Love Stamping - Christmas

Passion for Markers - #618 Anything Christmas

Uniko challenge - #68 Celebrate (optional: reds & greens)


STAMPlorations - Never-ending anything goes


Friday 19 November 2021

More inlaid die cutting

Hello everyone. If you have seen my previous post, it will come as no surprise that I created both a gold on silver version as a silver in gold version of my new Winter elements die set by Sizzix. 


This time, I did use a landscape design, similar to the card I saw in the Sizzix introduction video, but I used only silver and gold and used white hammered cardstock for my squares. I rounded the corners using my corner chomper and also blended very little grey ink from what was left on my blending brush.

I heat-embossed my sentiment (CAS-ual Fridays) in gold (Papermania).

I'm linking up my card at:

2021 Fall | Winter Coffee Lovers Blog Hop


Color Hues - #30 Silver & gold


HLS - Anything goes with dies


NBUS - #31


Warm winter wishes

Hello everyone. A few days ago, I finally received some crafty goodies that I ordered from the UK late September. One of the items was a fun die set by Sizzix, called Winter Elements. I decided to use it at once, since it also contained a fun cup, which made it perfect for a quick Christmas card as well as the Coffee Lovers Blog Hop.


My design was inspired by a Sizzix introduction video, but I rotated it to create a portrait card and stuck to a silver and gold colour scheme. I die cut my images twice, once in gold and once in silver card from my stash. For the background squares, I used a thinner silvery paper from my stash and an old square punch. The sentiment is from an older Winnie & Walter stamp set by Evelin T Designs.

I'm linking up my card at:

2021 Fall | Winter Coffee Lovers Blog Hop


Beccy's Month of Holiday Cards - D for die cutting


CCAYR - W for Warm winter wishes

Color Hues - #30 Silver & gold


Thursday 18 November 2021

Coffee addict

Hello everyone! I'm back with another card for the current Coffee Lovers Blog Hop. As with my previous card, I used elements from my UFO box to create this one.


I had previously created my square panel using a freebie stamp set from SSS and simply mounted it onto a smooshed panel. All I had to do was die cut the panel using a stitched rectangle (SSS) and adhering everything to my card base.

I'm linking up my card at:

2021 Fall | Winter Coffee Lovers Blog Hop

Day of the Month Card Club - #33 Beautiful day

SSS Wednesday - Make your own background 


Tuesday 16 November 2021

Tea time

Hello everyone. Once again, the Coffee Lovers Blog Hop snuck up on me. Can you believe we're already halfway through November, with Christmas around the corner? Where did the year go?


Anyway, this card was quick to make, thanks to the smooshed background and die cut from my UFO box. All I had to do was to die cut my panel and adhere it to my card along with the fun die cut, which was an add-on to the Alice in Wonderland kit by Love from Lizi last year. I also added a sprinkle of sequins for an extra pop of colour.

I'm linking up my card at:

2021 Fall | Winter Coffee Lovers Blog Hop


Crazy 4 Challenges - C4C610 Die cuts only


Wednesday 3 November 2021

Happy Holidays - Creating texture with dies

Hi everyone. November 1st marked the start of Beccy's annual Month of Holiday Cards Challenge. Hopefully, this will help me create lots of Christmas cards this month, since I am still way behind on my Christmas card stash. I'm also taking the current Holiday Card Workshop at Online Card Classes, which is also a great incentive to continue creating.

I'm also thankful for all of the challenge blogs out in blog land, because they also offer lots of ideas and inspiration.

Anyway, I created the panel for today's card using the smooshing technique and then decided to add some texture by embossing with the star die you see in the picture. I've had this die for several years now, but had not used it on a card yet, because after die cutting I ended up with all individual stars, which was not what I had expected. I do love how the embossing turned out, though, so I'll probably do this again. I cut my panel using a stitched rectangle die (SSS).

To create my scene, I die cut the sentiment circle (MFT) twice and layered the trees and deer (by Hero Arts, from my UFO box) on top. I added a sprinkle of mixed sequins for some holiday sparkle.

I'm playing at:

Beccy's Month of Holiday Cards - A for animal, aqua

Jingle Belles - Holiday creatures

HLS Watercolour - Anything goes


ATSM - #417 Christmas


SSS Wednesday - Anything goes


Tuesday 2 November 2021

October CCC reveal - Just for you

Hello everyone. It's time for the October 2021 Card Chain Challenge reveal.

My card was inspired by the Friendship theme and Faux Stained Glass technique options.
I had previously created my faux stained glass by heat embossing the outline image onto vellum and colouring on the back using Copic markers.

To create my round frame, I used an older die by Winnie & Walter. I did not think the needed much else, except for a simple sentiment (from an old but loved stamp set by Impression Obsession, All Occasions).

Do pop over to the CCC blog to see what everyone else made and/or to join the fun next month.

I'm also linking up my card at:

SSS Wednesday - Anything goes

Monday 25 October 2021

Christmas bunny

Hello everyone. I don't think I have ever featured a bunny on one of my Christmas cards until now, but I just could not resist this sweet character from the Sizzix Chapter 3 Doodle Christmas set. Especially after seeing Peter Hughes demonstrate the die set a Craftstash Live over 3 months ago. So when my order finally arrived a few days ago, I had to have a play right away.

All I did was a little ink blending in grey and red and a little pink for the cheeks. After creating my white panel using a stitched rectangle, I added some embossing paste through a snowflake stencil (SSS). The sentiment is from a Lawn Fawn stamp set (Thanks a Latte). I mounted my panel to a grey card base using thin foam tape and also popped up the sweet bunny using foam tape.

I'm linking up my card at:

CAS Christmas - Grey and red

HLS - Anything goes with dies


HLS Christmas - AG Christmas (optional: joy)


Jingle Belles - Not a creature was stirring (feature a creature)


ATSM - #416 Make your mark


NBUS - #31 AG with NBUS


Wednesday 20 October 2021

Snowflakes, stencilling, PP and stockings

To make things a little easier for you (and for myself), I decided to group my last three pink Christmas cards together in a single post. After all, each of these card inspired the next one.

While browsing the web, I spotted a pink card with translucent embossing paste over an ink-blended background. I copied that idea, using one of my non-Christmassy stencils by Stamperia. After my panel was dry and die cut using my stitched rectangle die (SSS), I added some gold splatters (that don't really show up in the picture but add a nice sparkle IRL). To finish off, I simply added 2 stacked snowflakes (SSS) and a previously stamped and die cut sentiment (SSS Christmas word mix).

I thought I could create a similar look using some patterned paper that I had already cut to size. I did blend some coral pink ink around the edges and behind the snowflake. I added Nuvo drops to the ends of the snowflake to match the yellowish elements of the PP.

For my final card, I used another sheet of the PP to create my hanging stockings. I had already stamped a die cut a bunch of these stocking images last year. They were originally designed as cookies (Gingerbread Fun, Paper Discovery), but I think I can use them any way I like. I did some quick colouring using my Copics. I created a faux wood plank by scoring a strip of kraft cardstock and swiping it with a grey-brown ink. The sentiment (from an older stamp set by Technique Tuesday) was heat-embossed in gold. For a fun touch, I decided to hang the stockings using some brads from my stash, so that they can move.

I'm linking up my cards at:

Jingle Belles - Dreaming of a pink Christmas 


As always, the first JB challenge in October
is all about pink holiday cards. 
And for every card that is being linked up 
this fortnight, the lovely Jingle Belles, 
Lauren and Stephanie, will each be donating 
2 dollars to the US Breast Cancer Research Foundation

I'm also linking up my first card at:

HLS - Anything goes with stencils


CCAYR - Sth. starting with S and/or T (Snowflake)

==========

My second cards is also playing at:

Christmas 24 - #40 Simply snowflakes

==========

While my third card is also playing at:

CHNC - #564 AG Christmas (optional: stockings)