Monday 25 October 2021

Christmas bunny

Hello everyone. I don't think I have ever featured a bunny on one of my Christmas cards until now, but I just could not resist this sweet character from the Sizzix Chapter 3 Doodle Christmas set. Especially after seeing Peter Hughes demonstrate the die set a Craftstash Live over 3 months ago. So when my order finally arrived a few days ago, I had to have a play right away.

All I did was a little ink blending in grey and red and a little pink for the cheeks. After creating my white panel using a stitched rectangle, I added some embossing paste through a snowflake stencil (SSS). The sentiment is from a Lawn Fawn stamp set (Thanks a Latte). I mounted my panel to a grey card base using thin foam tape and also popped up the sweet bunny using foam tape.

I'm linking up my card at:

CAS Christmas - Grey and red

HLS - Anything goes with dies


HLS Christmas - AG Christmas (optional: joy)


Jingle Belles - Not a creature was stirring (feature a creature)


ATSM - #416 Make your mark


NBUS - #31 AG with NBUS


Wednesday 20 October 2021

Snowflakes, stencilling, PP and stockings

To make things a little easier for you (and for myself), I decided to group my last three pink Christmas cards together in a single post. After all, each of these card inspired the next one.

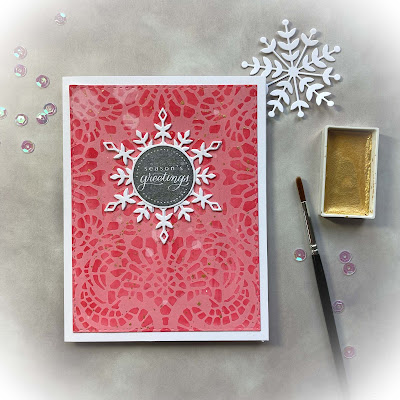
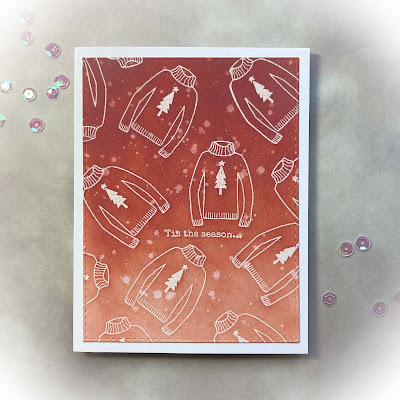
While browsing the web, I spotted a pink card with translucent embossing paste over an ink-blended background. I copied that idea, using one of my non-Christmassy stencils by Stamperia. After my panel was dry and die cut using my stitched rectangle die (SSS), I added some gold splatters (that don't really show up in the picture but add a nice sparkle IRL). To finish off, I simply added 2 stacked snowflakes (SSS) and a previously stamped and die cut sentiment (SSS Christmas word mix).

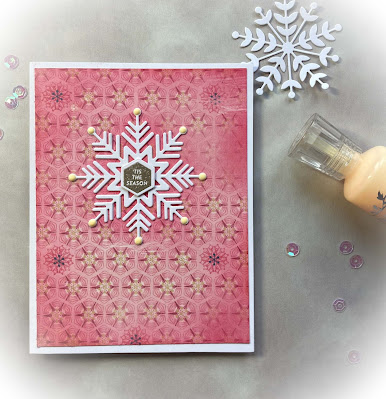
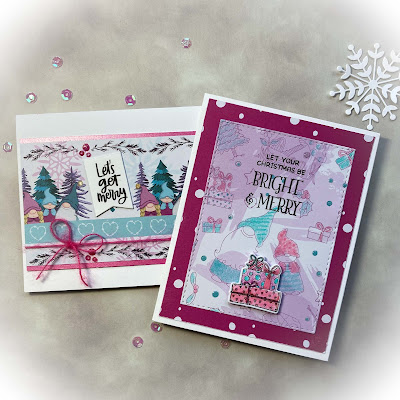
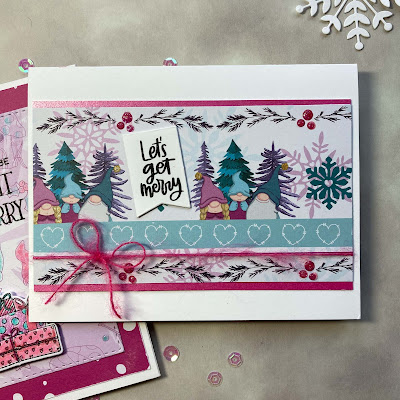
I thought I could create a similar look using some patterned paper that I had already cut to size. I did blend some coral pink ink around the edges and behind the snowflake. I added Nuvo drops to the ends of the snowflake to match the yellowish elements of the PP.

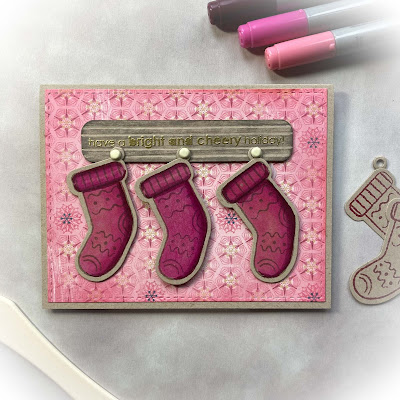
For my final card, I used another sheet of the PP to create my hanging stockings. I had already stamped a die cut a bunch of these stocking images last year. They were originally designed as cookies (Gingerbread Fun, Paper Discovery), but I think I can use them any way I like. I did some quick colouring using my Copics. I created a faux wood plank by scoring a strip of kraft cardstock and swiping it with a grey-brown ink. The sentiment (from an older stamp set by Technique Tuesday) was heat-embossed in gold. For a fun touch, I decided to hang the stockings using some brads from my stash, so that they can move.

I'm linking up my cards at:

Jingle Belles - Dreaming of a pink Christmas 


As always, the first JB challenge in October
is all about pink holiday cards. 
And for every card that is being linked up 
this fortnight, the lovely Jingle Belles, 
Lauren and Stephanie, will each be donating 
2 dollars to the US Breast Cancer Research Foundation

I'm also linking up my first card at:

HLS - Anything goes with stencils


CCAYR - Sth. starting with S and/or T (Snowflake)

==========

My second cards is also playing at:

Christmas 24 - #40 Simply snowflakes

==========

While my third card is also playing at:

CHNC - #564 AG Christmas (optional: stockings)


CAS stencilling for a pink Christmas

Hello everyone. I'm in the final stretch of posting this year's pink Christmas cards ... for now. I have enjoyed creating these so much that I cannot promise I won't be creating more pink Christmas cards this year LOL.

After waiting for many weeks or rather, several months, my crafty orders are slowly but steadily being released by Greek customs. The delay is caused by the new EU tax rules that came into effect on July, 1st. To give you an idea, I finally received a parcel from the UK yesterday, that had been shipped on June, 27th. 

Anyway, the stencil that I used on today's card (Winter Holly by Creative Expressions/Sue Wilson) arrived a few weeks ago. Since it's a slimline stencil, it did not cover my entire A2 card panel, so I decided to place it at an angle. After I finished my ink blending, I shifted the stencil slightly and drew the outlines using Chameleon fineliners. I also used these markers to add veins to the holly leaves and draw lines at the top and bottom. Because the panel still looked a bit bare, I added spots all over. 

To finish off, I foiled the edges of my card base using double-sided tape and foil sheets from a bargain store. I also created a small foiled panel for matting my sentiment (from an older SSS stamp set). I used my Copic markers to colour in the Love letters.

I'm linking up my card at:

Jingle Belles - Dreaming of a pink Christmas 


As always, the first JB challenge in October
is all about pink holiday cards. 
And for every card that is being linked up 
this fortnight, the lovely Jingle Belles, 
Lauren and Stephanie, will each be donating 
2 dollars to the US Breast Cancer Research Foundation

HLS - Anything goes with stencils


HLS Christmas - Anything goes (optional: Joy)


STAMPlorations Stencil - Anything goes


NBUS - #31 Anything goes with never before used stuff


Christmas eve

I created this card panel during the Eat Sleep Crafty Retreat that took place in June and was being hosted by Justine Hovey, Ingrid Blackburn and Laurel Beard. The virtual retreat was loads of fun and a great way to get my out of my creative slump, and I intend to join Justine, Laurel and guests again in November. 

I used my NBUS Christmas Eve stencil (Visible Image) and DOIs to do my ink blending. The stencil set contains both the positive and negative part of the skyline scene, besides Santa's sleigh and a big Christmas word.

Justine used a die and lights for her sky, but since I did not own any lights, I used another stencil (Create a Smile) to create a heat-embossed starry sky.

For my sentiment, I die cut my NBUS Joyful die (SSS) from plain white cardstock and used another prestamped and die cut strip (SSS Christmas Word mix) underneath.

I'm linking up my card at:

Jingle Belles - Dreaming of a pink Christmas 


As always, the first JB challenge in October
is all about pink holiday cards. 
And for every card that is being linked up 
this fortnight, the lovely Jingle Belles, 
Lauren and Stephanie, will each be donating 
2 dollars to the US Breast Cancer Research Foundation

HLS - Anything goes with stencils


STAMPlorations Stencil - Anything goes


NBUS - #31 Anything goes with never before used stuff


Tuesday 19 October 2021

Showing off my deer dies

This past year, I have been adding several NBUS deer dies to my die collection. So far, I owned only one (plain) deer die, the baby deer on the card in the middle. I'm happy I'm getting a chance to use them all so soon.


I had a single 6x6 sheet left of this muted pink patterned paper. I had used the sheets from the paper pad on my Christmas cards last year. So to make the most of my sheet, I cut it into three 2-inch strips, stamped the trio of trees from a Stamper's Anonymous set in a brown-grey ink and also blended a little ink around the panel and adhered each panel onto a white mat before adding the panels to my card bases. I die cut the deer from plain white cardstock and blended two colours of brown ink from the top and bottom. To finish off, I used a mix of previously stamped and die cut sentiments (Christmas Word Mix, SSS).

I'm linking up my cards at:

Jingle Belles - Dreaming of a pink Christmas

As always, the first JB challenge in October
is all about pink holiday cards. 
And for every card that is being linked up 
this fortnight, the lovely Jingle Belles, 
Lauren and Stephanie, will each be donating 
2 dollars to the US Breast Cancer Research Foundation

NBUS - #31 Anything goes with never before used stuff


Stamping Sensations - Animals, birds and bugs

HLS Christmas - Anything goes (optional: Joy)


HLS - AG with dies


Sparkles Christmas - #129 Flora and/or fauna


Sweater weather

Hello everyone. I'm more with more Christmas cards. When I was going through my UFO box, I found this fun panel that I had stamped a long time ago, using an Essentials by Ellen stamp set. At the time, I wasn't sure how to use it on a card. I had thought about creating a white panel on top with an aperture, showing only one sweater...


Now, I'm happy I didn't because it's much more fun this way, die cut using a stitched rectangle die and simply mounted onto my white card base.

I'm linking up my card at:

Jingle Belles - Dreaming of a pink Christmas 


As always, the first JB challenge in October
is all about pink holiday cards. 
And for every card that is being linked up 
this fortnight, the lovely Jingle Belles, 
Lauren and Stephanie, will each be donating 
2 dollars to the US Breast Cancer Research Foundation

12 Months of Christmas Linkup - #82 AG Christmas (optional: snow globes)

SOSS - #196 E for everything pink


CCAYR October - AG Christmas starting with S and/or T
(I went with Sweaters)

CHNC - #564 AG Christmas (optional: stockings)

Sweet shaker cards

For these two cards, I used supplies from my NBUS card kit from Love from Lizi. It arrived when I had already finished last year's Christmas cards, but I thought it would be perfect for this year's pink-inspired Christmas cards. I used the printed acetate sheets on both cards, as well as several of the ephemera elements. I did some soft ink blending in pink on my card panels.

On my polar bear card, I stamped a sentiment from the stamp set in the kit onto the acetate using an almost dry Stazon ink pad. Thank goodness I could restamp several times thanks to my MISTI. I combined some brandless clear iridescent sequins with a mix of pastel coloured sequins from my stash.


I forgot to stamp a sentiment on my second card before putting my shaker together, so I stamped it on a scrap of vellum, adhered it onto a piece of double-sided tape and fussy cut it. I used a different mix of sequins for my shaker element, including a few of the sequins that came with the kit.


I'm linking up my cards at:

Jingle Belles - Dreaming of a pink Christmas


NBUS - #31 Anything goes with never before used stuff


Watercooler Wednesday - WWC326 All about occasions


Sparkles Monthly - #145 Shaker card

And I'm linking up my polar bears at:

Christmas Kickstart - #55 Make one for a loved one


Monday 18 October 2021

Letting the papers do the work...

For these two pink-inspired Christmas cards, I decided to let the papers from the 12x12 paper pad by Crafter's Companion do (most of) the work for me.

For the first card, I simply added strips of shimmery pink centura pearl card behind a strip of patterned paper. I finished things off with some pink thread, a previously stamped and die cut sentiment (SSS) from my UFO box and Nuvo drops. I also added a little shimmer to the pigtails and jingle bells.

For my second card, I decided to do some quick and random colouring to the images on the patterned paper using coloured pencils. I die cut my panel using a stitched rectangle die (SSS) and matted it with another paper from the paper pad. I stamped and die cut the pile of gifts from the matching stamp and die set, coloured the image using Copics and mounted it on my card using foam tape. I added Nuvo drops to the teal dots and Glossy accents to the bows on the gifts.


I'm linking up both cards at:

Jingle Belles - Dreaming of a pink Christmas 


As always, the first JB challenge in October
is all about pink holiday cards. 
And for every card that is being linked up 
this fortnight, the lovely Jingle Belles, 
Lauren and Stephanie, will each be donating 
2 dollars to the US Breast Cancer Research Foundation

I'm also linking up the second card at:

ATSM - #416 Make your mark


CHNC - #564 AG Christmas (optional: stockings)

Gnome for the holidays

I'm not a fan of the gnomes that you see in some gardens, but I could not resist this sweet NBUS gnome set by Crafter's Companion. And when I ordered the Tiffany craft & carry workstation (which was perfect for crafting outside on the terrace), it came with a free 12x12 paper pad from the same collection. I love that the gnomes are so easy to colour. I simply coloured them using my Copic markers and then used the stencil in the set to add the details to the coats and hats using dye inks and a blending brush.

I also used my markers to colour in the gifts. The stamp featuring the small gift comes with the hands attached. For the pile of gifts, I simply added the hands from the other stamp. The gnomes were die cut using the matching die from the set. I decided to fussy cut the presents because I preferred the look.

I used one of the papers from the paper pad for my background. The paper featured a few blue hearts, but I used a coloured pencil to make them purple. I covered up the one on the right with a die cut heart from pink centura pearl card, which I also used to mat my panel. The panel itself was die cut using the stitched rectangle from my NBUS Pinked slimline dies (CASual Fridays). 

I'm linking up my card at:

Jingle Belles - Dreaming of a pink Christmas

As always, the first JB challenge in October
is all about pink holiday cards. 
And for every card that is being linked up 
this fortnight, the lovely Jingle Belles, 
Lauren and Stephanie, will each be donating 
2 dollars to the US Breast Cancer Research Foundation

ATSM - #416 Make your mark


ABC Christmas - U for Under the tree

12 Months of Christmas Linkup - #82 AG Christmas (optional: snow globes)

CHNC - #564 AG Christmas (optional: stockings)

Passion for Markers - #613 Make it cute

NBUS - #31 Anything goes with never before used stuff


Peaceful poinsettia

Hello everyone. I've been on a roll creating cards these past few weeks, especially PINK Christmas cards. If you have been following my blog for a while, you will know that I always create pink Christmas cards in October in support of the annual PINK challenge over at the Jingle Belles blog. As always, the lovely Jingle Belles, Lauren and Stephanie, will EACH be donating 2 dollars to the US Breast Cancer Research Foundation. And since I am way behind on my Christmas card making, I was really determined to go and create some cards. So here's the first one.

I am also trying to us a lot of NBUS supplies, some brand new and some older stuff that have been patiently waiting in my stash...

I decided to stamp my poinsettias (from a NBUS stamp set, Debra's poinsettia, by Winnie & Walter, who are sadly no longer in business) onto kraft cardstock, stamping the base layer in white pigment ink. I die cut the Peace sentiment (Penny Black) and skinny frame (Frames die set, SSS) from white glitter card (Marianne Design), adding dimension to the sentiment using foam.

I'm linking up my card at:

Jingle Belles - Dreaming of a pink Christmas


NBUS - #31 Anything goes with never before used stuff


Winter Wonderland - Pinecones and/or poinsettias

HLS Christmas - Anything goes (optional: Joy)


Watercooler Wednesday - WWC326 All about occasions