Monday 31 January 2022

Oceans of Happiness

Hello everyone. Hope your week is off to a great start. 
I managed to create a card in the nick of time for the current Under the Sea theme at Let's Squash It!

This was a perfect opportunity to take out my NBUS stamps and embossing folder that came with a UK crafting magazine (Creative Stamping 97) that I recently ordered in a sale.


I started by die cutting a panel from CC watercolour card using a stitched rectangle die (SSS). Next, I used one of my NBUS Tim Holtz diffusers that I have had for a few years but never used so far (because I could not find them when I actually did want to use them ... sound familiar?). I had intended to centre my embossing, but the diffuser shifted. I decided to go with the flow and love how it turned out in the end.

I used a brush to wet the embossed area before dropping in some smooshed distress ink colours and used a foam applicator to add a little Faded Jeans on some of the raised area once the panel was dry. I used Juniper mist ink (Catherine Pooler) to stamp some small fish and add colour to my sentiment strip before heat embossing one of the sentiments from the stamp set.

The dolphins from the set were stamped using Memento black ink, coloured in with Copics, fussy cut and popped up on foam tape.


To finish up, I did some stamping on the inside using Juniper Mist. The happy birthday sentiment is from a SSS stamp set.

I'm linking up my card at:

Let's Squash It! - #16 Under the Sea


SSS Wednesday - Anything goes

SSS Monday - Use an embossing folder

ATSM - #421 Make your mark


Passion for Markers - #625 Embossing 
(heat or dry - I used both)

Stamping Sensations - Stamping and dies


Wednesday 26 January 2022

Zero-calorie sweets and treats

Hello everyone. Thanks for stopping by. I have another duo of cards to share for a couple of challenges.

I had these stamped and die cut Christmas gingerbread cookies (Gingerbread Fun, Paper Discovery) in my UFO box after creating some cards last year, so these cards were really quick to put together.


All I needed to do was add a selection of gingerbread cookies to a strip of dark red cardstock and adhere these to my cards. A simple sentiment (Winnie & Walter) finished them off.

I'm linking up my cards at:

Jingle Belles - Getting fit for 2022 / sweets and treats


SSS Wednesday - Anything goes

CHNC - #578 Anything Christmas goes


Twofer flowers

Hello everyone. Thanks for stopping by.
I recently took part in one of Justine Hovey's card making sessions for her VIP members. I'm finding those sessions great for getting cards (or at least card panels) done in a short time without overthinking. Justine gives a basic supplies list in advance but I usually need to quickly adjust and grab some supplies to craft along. But this time I had this floral stamp already out...


Anyway, I created these two panels during the live, using my NBUS Beautiful Day Floral stamp set that I purchased from Catherine Pooler's shop during the Black Friday sale. I kept my Copic colouring very simple and monochromatic, since I wanted to create a card for the current Flower Challenge.

After the session was over, I popped up the coloured oval on my black and white panel and finished the card off with a simple sentiment and a few Lily of the valley gems (Little Things from Lucy's Cards).


I decided to turn my second card into a shaker card using some NBUS glitter and sequin fragments. The fragments have a pale yellow colour that perfectly matches my colouring. I finished off with a white heat embossed sentiment and a few more gems.

I'm linking up my anniversary shaker at:

The Flower Challenge - #64 Monochrome

Time Out - #205 In love


Dawn's challenge: all about occasions


I'm linking up my duo of cards at:

ATSM - #421 Make your mark


Wednesday 5 January 2022

Using up scraps

Hello everyone! Welcome back!
I was determined to join the fun at the Snippet's Playground this month, so I sat down in my craft room and decided to revisit an old Love from Lizi card kit (Nov 2019). I knew I had several scraps left after creating the cards from this post.


For my Winter Wishes card (top left), I cut a pinkish PP scrap in two lengthwise and placed it on either side of a strip that I cut from one of the 6x6 papers from the kit, leaving a small gap. Next, I die cut two snowflake borders (NBUS die from an older Crafter's Companion card kit), from two white snippets that I'm always left with after creating top panels for my American-sized  A2 cards using regular A4 Neenah cardstock. I decided I did not like the small gap between the black and pinkish strips, so I added peel-off strips from the card kit. To finish off, I used one of the sentiment decoupage elements from the kit.

For my Season's Greetings card (top right), I used a scrap of green linen cardstock and trimmed it to the perfect height for my card. I used one of the toppers from the kit and framed it with more peel-off strips. I stamped my sentiment on another snippet of PP from the kit and added peel-off strips to the top and bottom. To finish off, I added a few decoupage elements to the topper.

For my Joyful Wishes card (bottom right), I used a scrap of PP and trimmed the top so that it would fit my card. I matted it onto a scrap of black cardstock. I was left with a small strip that had the perfect width to place behind the sentiment element from the kit and to show off the ribbon (also from the kit). To finish off, I added a few Nuvo drops that either came in this kit or another LfL kit.

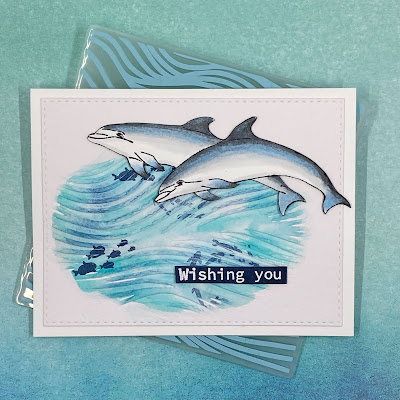
For my Snowflakes card (bottom left), I used more white cardstock snippets for my snowflake borders, as well as another snippet of PP. I heat-embossed one of the sentiments from the kit and did some ink blending around the circle. I created a mat for my circle using a snippet of glitter cardstock. I finished off with a small decoupage element and Nuvo drops.

And then I decided to create my ultimate snippets card.


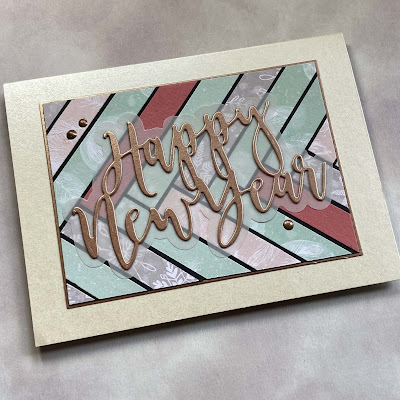
I still had a few strips of PP left as well as a snipped of the pinkish cardstock from my previous card. I cut most of these strips in two lengthwise and adhered them to a snippet of black cardstock After the panel was complete, I trimmed it to size and matted it onto a snippet of Centura pearl (not sure if you would call it rose gold or bronze), after die cutting the sentiment using a NBUS die. To make the sentiment stand out a bit more from the busy background, I cut a mat from vellum using the outline die.
I adhered everything to a Centura pearl card base.

It felt great creating 5 cards for my 2022 Christmas card pile AND using up some scraps in the process!

I'm entering my New Year's card into the following challenges:

Pixie's Snippets Playground - #418 Mega Christmas draw
Making these cards definitely kept me from making mischief LOL

SSS Wednesday - Something new

My Snowflakes card (bottom left) is playing at:

Make my Monday - #165 Snowflakes


Sunday 2 January 2022

December CCC reveal - Stencilled trees

Hello everyone. Happy New Year!
It's the 2nd of the month and that means it's time for the December 2021 Card Chain Challenge reveal.
My card went to Arlene in California.


The inspiration for the December challenge was the following tic-tac-toe card:

This one really had me stumped for a while, but in the end I decided to go with the first row down.

I started by blending green ink in the middle of my card and then shifted the Tim Holtz tree layering stencil to apply Sparkle Medium in Sage Green (Imagination Crafts). I do love this colour.

I heat-embossed my sentiment in gold and matted the sentiment strip with Centura pearl card in a matching colour. Before adhering the sentiment panel to the card, I added two tree brads from Eyelet Outlet that have been in my stash for several years.