Sunday, 24 November 2024

Polar Bear

This card came together quickly, using elements from my UFO box. I adhered the bottom of the bear directly onto my card base, but added thin foam tape behind the ears. I also added strips of thin foam tape behind the frame.


Bear: Festive Bear and Deer die set, Katie Skilton

Frame: Sue Wilson, Creative  Expressions
Sentiment strip: not sure of the brand as it was in my UFO box

I'm linking up my card at:

Beccy's Month of Holiday Cards - C ... Cute Christmas Critter


ABC Christmas - X for Xylophone (photo inspiration)


The Cutie Pie - #200 Special occasions


Tuesday, 19 November 2024

Christmas treats

Hello everyone. I have 2 cards to share that are similar in design but with the colours red and green switched around.

I started by randomly stamping the red candy canes (old Stamp of Approval collection, Catherine Pooler), onto white Neenah cardstock and then filling up the spaces with brown coffee cups (Verve Stamps) and green candies (Stamp of Approval collection), using Distress Oxide inks. I die cut the panels using a SSS stitched rectangle. 

For the sentiment topper, I used a Neat & Tangled stamp and die cut the circle using a Winnie & Walter die. The sentiment topper got lost against the busy background, so I decided to do some ink blending using Pumice Stone regular distress ink, and I love how that turned out.

I'm linking up my cards (left card for those challenges requesting only one card)  at:

Jingle Belles - Christmas feast (Christmas food and treats)

Beccy's Month of Holiday Cards - Change colours (day 8)


Make My Monday - #239 Food and/or drink

We Love Stamping - Christmas

Allsorts - #807 Anything goes (option: food and drink)


Sunday, 3 November 2024

Blue Christmas shaker card

Hello everyone. Here's my second set of cards for Beccy's Month of Holiday Cards link-up.

Just like the previous cards, today's design was inspired by a card that Stephanie Severin created last year. I did not have time to finish and post my card for the recent CASE prompt at Jingle Belles, but here it is.

My inspiration was this monochromatic card by Stephanie.


The patterned paper I used was from the same paper pack as the PP on my previous card (Lisa Horton Scandi Christmas) that came with a UK crafting magazine (Papercraft Essentials 204). The background was stark white, so I antiqued it using Antique linen distress ink. Stephanie had sprayed her panel with clear sparkle spray, which inspired me to turn my cards into shaker cards with glitter snow and some sequins. I coloured my frame after die-cutting using 2 rectangle nesting dies (Creative Craft). The sentiment strip came from my UFO box.

I'm linking up my card at:

Beccy's Month of Holiday Cards - B ... for Blue 

Peace on Earth Christmas - #75 AG Christmas

SSS Wednesday - Anything goes

Allsorts - #805 Magic of the season

Thursday, 31 October 2024

Christmas animals

Hello everyone. In Australia, the month of November has already begun, which means that Beccy's month of holiday cards linkup has started. It's always a great way to boost my Christmas card making.

This card was inspired by a recent challenge at Jingle Belles, where we were invited to CASE a card made by either Stephanie or Lauren. I was inspired by the card below that Stephanie created in 2023.

I pretty much copied her design, but changed the colour scheme, and opted for a horizontally striped pattern insteadnof the diagonal stripes. I also decided to stamp my sentiment on the middle panel and added gold peel-off stickers to add definition to my middle panel.

I'm linking up my cards at:

Beccy's month of holiday cards - A ... for animals


October Rudolph days - AG Christmas


Wednesday, 23 October 2024

Christmas piglet

I have one more card to share with you today. I found these strips of patterned paper (Studio Light) in the package with the papers and tags. I had cut them previously for a particular layout but couldn't remember what that layout was, so I decided to layer them and create a new design. I fussy-cut the jar with the pigles and popped it up using a scrap of cardstock behind it. I decided to use up a bunch of left-over stamped and die-cut sentiments (SSS) to finish off my card.


I'm linking up my card at:

Jingle Belles - Pink Christmas (for the cure)

SSS Wednesday - Christmas

Allsorts - #803 Patterned Papers


Double embossing

Hello everyone. I used double embossing on this card. I first ran my panel through my die-cutting machine with a very old Cuttlebug EF (Swiss dots) and then ran it through again using this poinsettia  EF by Sizzix. I added some ink blending on the flowers and matted my panel with black before adhering it to my card base. I finished off my card with a stamped and die cut sentiment.


I'm linking up my card at:

Jingle Belles - Pink Christmas (for the cure)

SSS Wednesday - Christmas

Aud Sentiments - #318 Embossing and/or fall + a sentiment


Warm winter wishes

Hello everyone. I'm back with another pink-inspired Christmas card.
For this one, I inked up the inside of my embossing folder (3D Cable Knit, Gemini) before running it with a panel of watercolour card through my die-cutting machine. I then rubbed a purple ink pad (Elderberry, Memento) over the raised part and along the edges.


I wrapped multi-coloured fibre from my stash around my panel before adhering it to my card base using double-sided foam. I stamped the sentiment (Festive fun sentiments, Katie Skilton) in the same elderberry ink, and die cut it using a circle die. I adhered it to a slightly larger circle that I inked up with the same ink and popped it up using foam tape.

I'm linking up my card at:

Jingle Belles - Pink Christmas (for the cure)

SSS Wednesday - Christmas

ATSM - #479 Any occasion

Monday, 21 October 2024

Embossed Christmas trees

Hello everyone, I'm back with more pink deliciousness. I am so loving embossing folders right now as well as using up my UFO stash. For the cards below, I used previously smooshed panels from my UFO box, die cut them with a stitched panel die before running them through my die cutting machine with an old Cuttlebug embossing folder. I then rubbed over the embossed image with a Delicata gold ink pad. I finished them with sentiments (Simon Says Stamp) from my UFO box.


I'm linking up my cards at:

Jingle Belles - Pink Christmas (for the cure)
Stephanie and Lauren are donating $2 each
to the US Breast Cancer Research Foudation
for each card that is linked up this fortnight.

Allsorts - Anything goes

Aud Sentiments - #318 Embossing and/or Fall + a sentiment


More pink embossing

I have another duo of cards made from embossed panels that I created last year. I inked up the inside of the embossing folder (Scribbley Wishes, Leonie Pujol) once and then spritzed with water for the second and third impressions. Here's the link to the card that I made with the first impression last year.


The sentiment on the first card (2nd impression) is from Festive Fun sentiments (Katie Skilton), with a fussy-cut piglet from a Dutch paper pack that I bought 2 years ago.

For my second card (3rd impression), I used a sentiment from an older Winnie & Walter set (In a Word: Grand Merry) and a NBUS poinsettia die (Stylish Poinsettia, Sue Wilson for Creative Expressions), adding some soft ink blending on the middle die cut. I had also did a little ink blending around the edges when I first created this panel.

I'm linking up my card at:

Jingle Belles - Pink Christmas (for the cure)

ABC Christmas - U for unual colours

SSS Monday - Spooky and/or add some purple


Sunday, 20 October 2024

Pink Poinsettias

Hello everyone. This fortnight, the Jingle Belles are hosting their annual Pink Christmas again, where Lauren en Stephanie will be donating $2 each to the US Breast Cancer Research Foundation for each card that is linked up this fortnight.

If you have followed me for a while, you know I love making Christmas cards featuring pink. I have been creating several cards, so it's high time I actually posted and linked them here.


I had created these pink smooshed and embossed panels last year but never got around to turning them into cards. Last week, I was inspired by this card that Nina-Marie Trapani made for the new Simon Says Stamp release, featuring a 3D poinsettia embossing folder with a matching die. I figured I could do something similar by fussy-cutting one of the poinsettias and placing it on top. I coloured them using Copics. For the second card, I also embossed the poinsettia from gold card. I used the same gold card for the mat on the top card and for the sentiments (Frames and sentiments, Katie Skilton). The stamped and die-cut words are from by UFO box (SSS stamp set with matching die).


The first poinsettia that I coloured turned out a little too pink, so I added that one to another card on top of a smaller embossed panel. I matted it with a pink panel. The stamped and fussy-cut sentiment came from my UFO box.

I'm linking up my slimline cards at:

Jingle Belles - Pink Christmas (for the cure)

ABC Christmas - U for Unusual Christmas colours

BYSH - AG Winter Holidays


Sparkles Christmas - #165 Use the word Christmas on your card
(applies to second card)


Wednesday, 2 October 2024

Stencil fun for Card Chain Challenge September 2024

Hello everyone. It's the 2nd of the month and that means it's time to reveal all of the cards that were exchanged worldwide in the September Card Chain Challenge.

This month, my card went to Tina in Slovenia.

Using the sketch for inspiration, I pulled out a NBUS stencil (Castle Scene, Apple Blossom) and used the rainbow image on the stencil to create my front panel. The NBUS Creative Craft stencil brushes were a recent purchase from Crafstash in the UK. I really like how easy it was to get into the smaller areas. I matted my panel using a snippet of red cardstock and then pulled out some pretty papes frommy stash in matching rainbow colours. I felt this sentiment from my NBUS Woodware stamp set (Imaging Verse) was the perfect complement to my rainbow scene.


Do check out what the other participants have created in the CCC reveal post.
There's also still time to link up for the October Card Chain Challenge


I'm also linking up my card at:

Allsorts - #800 Anything goes
A big shout out to Brenda and the team for
keeping this weekly blog running for so long!

SSS Wednesday - Anything goes


Monday, 2 September 2024

Fantasy Flowers for August Card Chain Challenge

Hello everyone. It's the second of the month, which means it's time to reveal all of the cards that we exchanged in the August Card Chain Challenge.

This month, my card went to Gundi in Germany.

I used my NBUS Fantasy Flowers die set (Alex Syberia) to create my colourful bouquet, using this month's colour option.


I selected coloured cardstock from my stash and did some ink blending in slightly darker colours to add shading. To soften the colour on the inside, I blended a little white pigment ink. I arrange my flowers onto my panel and then took a picture using my phone as a reference while adhering the different elements to my panel. 

For my background, I used a sheet from a NBUS paper block (Textures, Craft Sensations) that was a present from my sister and die cut it using one of my trusted SSS stiched rectangle dies.

To finish off, I used a sentiment from the Spring Garden set by Alex Syberia that I had previously printed and cut out using the matching die, and a twine bow. 


I'm also linking up my card at:

NBUS #66


SSS Wednesday - Anything goes


Wednesday, 28 August 2024

Old-fashioned Christmas and a farewell

Two days ago, we had to say goodbye to our beloved 15-year old male cat, Rolmops. When he was a small and chubby kitten – and about the same age as the queen of our household, Kokkini, who was born in our home – he would roll over in front of our feet while we were walking on the street, showing us how cute he was and telling us he was ready to be adopted. It wasn't until our 2 Dutch cats passed a few months later that he finally got his wish. We miss him but know he is happy and free now, and without any pain.


On a happier note, I have another Christmas card to share. I coloured in this Santa image (NBUS Crafter's Companion, Believe in the magic) using Copics, die cut the panel with a SSS stitched rectangle and adhered it to my card base (Schoolhouse red, SSS).


I'm linking up my card at:

Jingle Belles - Old-fashioned Christmas


SSS Wednesday - Anything goes

Sunday, 25 August 2024

GD at Rudolph Days - Dachshund through the snow

Hello everyone. I'm thrilled to be making a guest appearance today at this month's Rudolph Days, an Anything Goes Christmas challenge that runs from the 25th until the end of each month.

I used a shimmery galaxy background and a (possibly NBUS) treescape die cut from my UFO box and paired it with this sweet dachshund from a NBUS stamp set (Santa Paws) by Art Impressions. I coloured him in using Copics, using the image on the packaging for reference, and then fussy-cut him so that I could pop him up.


Do check out the Rudolph Days challenge to see what the other guest designers and our host, Helen, have created. And of course you are more than welcome to play along.

I'm also linking up my card at:

Art Impressions - #385 Keep calm and celebrate on!


ATSM - #475 Stencils and die cuts

Christmas Kickstart - #89 Animal antics

Sparkles Christmas - #164 Christmas critters


Wednesday, 31 July 2024

Two snowy trees

Hello again. I have two more Christmas cards to share today. When I went to place the frame of my previous card between some heavy books to flatten it, I discovered these two snowy panels from a previous play session, so I decided this was a good moment to turn them into cards.

The panels had been created with the top of a large Stamperia stencil. To create more of a feel of a Christmas tree, I first painted the outline of the tree using Catherine Pooler ink and a large watercolour brush, using the stencil as reference. I also created the stars by blending yellow ink through the stencil. After the panel had dried, I placed the stencil again and added this glitter embossing past that contains flecks of mica. 

I created the frame using hammered cardstock and 2 nesting frames of a NBUS Card Making Magic label die set that I selected as a free bonus with a recent purchase from CraftStash. I finished off with a sentiment die from an older Tonic Chrismas kit. I die cut the sentiment using a snippet of the gold paper from my previous card and vellum for the outline.

I'm linking up my cards at:

Christmas Kickstart - #88 Festive Frames

Double Trouble - #171 Drive-thru window

Thing 1 - Window/aperture
Thing 2 - Snow
Thing 3 - Play at Jingle Belles


Jingle Belles - Dashing through the snow

Rudolph Days - July AG Christmas


Framed Christmas sentiment

Hello everyone. I realized that I had better hurry up posting this card before a couple of challenges are closing today.

I adhered the thin gold paper to some cardstock befor die-cutting my frame using a NBUS die (Paper Discovery, Tag builder die set). The gold-embossed sentiment from an older Penny Black set fitted perfectly in the aperture. To finish off my frame, I stamped the holly and berries from an old stamp set and adhered it using wet glue and foam tape. To add a little more interest to my ivory cardstock, I used an old Cuttlebug embossing folder and White linen DOI to stamp the embossed design onto my card base.

I'm linking up my card at:

Christmas Kickstart - #88 Festive Frames

Double Trouble - #171 Drive-thru window
Thing 1 - window/aperture


Wednesday, 3 July 2024

A cup of cheer

Hello everyone. I'm back with another shaped Christmas card.

I had intended to CASE these cards I had created for the previous Jingle Belles challenge using a large oval die I thought I had, but I could not find it. Instead, I found this NBUS stamp and die set by Crafter's Companion, called Craft in a Mug. Thanks to its large size, it was perfect for creating this shaped card.

I did some partial die-cutting to keep the mug and cream parts together, and then added my stamping. The sentiment is from an older Penny Black set, called Festive Cheer. After doing some ink blending on the mug and Copic colouring on the cream, I decided I wanted to add the sprinkles from the stamp set, and heat-embossed them in gold. 

I used my finished mug as a template to create the back of my card, again using partial die-cutting. I added a scoring line along the left side of the mug and used strong double-sided tape to adhere the ears together.

To finish up, I stamped, heat-embossed and die-cut the spoon from the CC set, added a little shading using a Copic marker and used glue dots and some festive baker's twine to adhere the spoon to the mug. I also added a few sparkly gold stars.

I'm linking up my card at:

Jingle Belles - Shaping up for the Holidays

NBUS - #64 AG with NBUS


Shopping our Stash - #525 NBUS

Tuesday, 2 July 2024

Shaped Christmas card

Hello everyone. I have this sweet little card to share with you today.
I used dies from a Tonic kit to create my layers from white shimmery cardstock and some recycled blue card from the back of a an old Christmas card. The sentiment die is from the same kit.
To turn my snowflake design into a card, I die cut the outline die again from white cardstock and added a fold using my scoring tool and attached this scored top using strong double-sided tape.

To jazz things up a little, I splattered some Blue gold paint from my Gansai Tambi Starry Colors set, also adding a little paint around the edges of my card and added Crystal drops aroud the sentiment.

I'm linking up my card at:

Jingle Belles - Shaping up for the Holidays

CCAYR - AG Christmas of Winter Holiday

MLCCB - #57 AG Christmas

SSS Wednesday - Anything goes


Wednesday, 19 June 2024

Revisiting a simple patterned paper technique

Hello everyone, I'm popping in with 3 quick cards using a patterned paper trick I also used last year. It's an easy way to use up some of those patterned papers some of us have been hoarding. I have this big 12x12 paper pack by Crafter's Companion with lots of coordinating papers in different colour themes.


I started with 3 panels that I cut to be slightly smaller than my card size. Next, I stacked them and used my trimmer to cut each stack into 3 pieces. I then divided them over 3 cards so that each card had 3 different patterns on them. 

I die cut my Li'l gnome (SSS) from some scraps in colours that matched the colours of my patterned papers and added these to a sentiment panel (paper included in the CC paper pack) that I die-cut with a die from one of Catherine Pooler's old Stamp of Approval boxes. I went around the edges of the sentiment panel with a little Cranberry Fizz ink (CP) using a blending brush. I used Copics to colour in the nose and add definition to the beard.

I'm linking up my trio at:

Jingle Belles - We Three Kings or Three of a Kind

Sparkles Christmas - #161 Use die cuts

The Holly and Ivy - #165 Anything Christmas goes


Sunday, 2 June 2024

May Card Chain Challenge Reveal

Hello everyone. It's the 2nd of the month and that means we get to show all of the cards that were exchanged for the May Card Chain Challenge.

This month, my card went to Robyn in Australia


I went with this month's colour palette of Gold, Raspberry and Blueberry.
When I need to find inspiration to get started, I often turn to my unfinished panels and bits and bobs in my UFO box. This time, I found the smooshed background panel with just the right colours, the die-cut flower heart and the heat-embossed die-cut sentiment. I cut the panel to size using my SSS stitched rectangle die. I swiped Distress Oxide inks in matching colours over my die-cut and to create the matching border on my white card base. I added gold glitter washi tape to my panel before adhering it to my card base. To finish off, I used my gold sparkle pen to colour in the hearts of the flowers.

I'm also linking up my card at:

SSS Wednesday - Anything goes


Tuesday, 7 May 2024

Two more cards with the man in red

Hello everyone, I'm back with two more Christmas cards featuring this cute Santa. When I had the Santa die out, I thought I might just as well cut him 4 times.


For these cards, I also die cut a few trees and a gift from the same set. The trees were die cut from a snippet of the backside of an old Christmas card, the front of which I had already upcycled in the past. It so happened that the colour was the perfect match for the dark green in the journallig cards.

I stamped the sentiment on the top card in Spruce CP ink and used a prestamped and precut sentiment from my UFO box for the bottom card. And I decided to add a sparkly star to adorn onw of the treea on either card, just because I could and because I happened to find these NBUS stars in my drawer. 

I'm linking up my cards at:

Jingle Belles - Santa

MLCCB - #56 AG Christmas

Peace on Earth Christmas - #63 AG Christmas

Monday, 6 May 2024

The man in red

Hello everyone. Today I have a pair of Christmas cards where Santa is taking centre stage. 


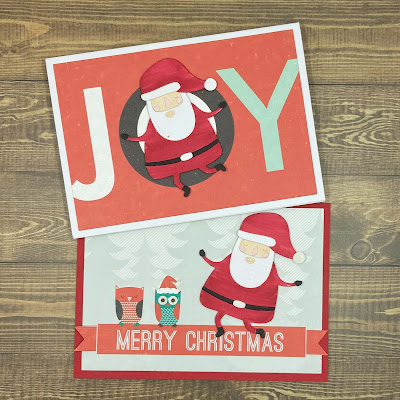
I die cut the Santas from heavy-weight white cardstock and coloured the different elements using Copics. Colouring Santa and putting all of the pieces together took up the most work, since I used NBUS journaling cards that have been in my stash for a long time, and cut it to the right size for my A6 card using a NBUS stitched rectangle die. This is also the first time that I used this Santa die, which is from the same set as the cute bunny on this card (Sizzix Chapter 3 Doodle Christmas).

I finished off the card with the cute Christmas owls with glossy accents on various elements, and used a sparkle pen on the letters of the JOY card.

I'm linking up my cards at:

Jingle Belles - Santa

MLCCB - #56 AG Christmas

Peace on Earth Christmas - #63 AG Christmas


Thursday, 2 May 2024

CCC reveal April and March

Hello everyone. It's the 2nd of the month, which means it's time to reveal all of the cards that were exchanged this past month in the Card Chain Challenge.

This month, my card went to Karolina in the UK, who was joining the fun for the first time this month.

I found this background panel in my UFO box, which was just perfect for this month's colour option of lilac, evergreen and silver. I paired it with 2 die-cut flowers from a NBUS die by SSS, that has been waiting to be used for a loooong time. I coloured the flowers with Copic markers. To finish off, I heat-embossed the Sending Hugs sentiment in Liquid Platinum embossing powder onto a scrap of lilac card that matches my card base.

I'm also linking up my card at:

SSS Wednesday - Feminine

NBUS #62


Today, I'm also sharing the card that I sent to Pia in Norway last month for the CCC in March, following the Postal theme and the String product option.


This card went to Pia in Norway. I used my NBUS postage die and layered stencil set by Waffle Flower.