Thursday 28 April 2016

We belong together

On the eve of our 15 year wedding anniversary, I wanted to create a card for the current Paper Smooches challenge, using an older (but hardly used) border stamp set, Geo-Graphic. Although I did not plan it that way, I ended up creating an anniversary card for my DH, and I'm happy to say he loved it!


I repeatedly stamped the hexagon pattern and heat-embossed in clear embossing powder. After that I brushed Perfect pearls over it to create a Faux metal look, a technique I picked up from Jennifer McGuire's blog last week. Below you can see what the stamped pattern looks looks like lying flat, but when it catches the light, oh boy. Love it!


I found a sentiment (Clearly Besotte, Say it in style) that fitted perfectly within a row of hexagons. I heat-embossed it in white (SSS). I die cut my panel using a stitched rectangle die (SSS) and mounted it onto my card base using foam tape. The die cut heart was found lingering in my box with left-over die cuts. All I had to do was mount it onto my card using foam tape.

Challenges:
Paper Smooches - April challenge: black/white & pop of colour
The Challenge - Masculine photo inspiration (I focussed on the black and metal combo)
STAMPlorations - April theme and/or sketch (I followed the sketch; see below)
SSS Wednesday challenge - Anything goes
Uniko - Use metallics
ATSM - 191 Anything goes


Sunday 24 April 2016

You are a Work of Art

Just a quick post from me sharing a card that I made earlier today.


When I saw the inspiration over at the Tag You're It challenge, I knew I wanted to combine this challenge with the current challenge over at CAS Mix Up. I used stencilling (Prima), stamping (PTI), ink blending (Hero Arts), die cutting (Lil' Inker), vellum, texture paste (Ranger) and heat embossing (Ranger Detail gold). So many products and techniques, and I still managed to keep my design CAS lol.
When I was trying to determine how to place my stencil over my card base, I thought those large triangles at the bottom were perfect to stress the sentiment, so I added some texture paste through the stencil to accent the 2 triangles on the right, sprinkled with embossing powder and heat embossed after approximately 20 minutes. Because the embossing paste was still a little wet underneath, it puffed up, giving some wonderful texture. Call it beginner's luck...


With its uplifting sentiment, this card also fits the friend theme at Virginia's View link-up party, and the butterfly fits the theme of the very first challenge at Create With Stamps (my second entry).


Wednesday 20 April 2016

MCV 40 revisited

I could not stop at one Christmas card using the layout of this week's MCV muse, Chris Blagrave. Love how you can create a different look and feel by using a different background, frame and embellishment.


Not sure if it's allowed to enter multiple cards, but I'm taking my chances, so I'm entering it in Muse: ChristmasVisions 40. As a refresher, here's the inspiration card by Chriss Blagrave again:


I'm also linking my card at:
CHNC - 277 Cute or anything Christmas goes
CHNC Extra - Always Anything Christmas goes


Sunday 17 April 2016

Merry Monday and Christmas Muse

After spending most of my day out in the sun, I decided I wanted to create a Christmas card using this week's inspiration of Muse ChristmasVisions and Merry Monday. I used the layout and design elements from MCV (patterned paper, 2 layer sentiment panel and an embellishment) and the colour combo from MM (red, green, kraft and white).


Materials used:
Neenah desert storm & solar white cardstock
Red cardstock (Simon Says Stamp)
Patterned paper (Dutch bargain store)
Frame dies (Simon Says Stamp)
Sentiment stamp (Studio Calico)
Poinsettia dies (Brittania dies, Joanna Sheen)
White gel pen
Enamel Accents
Clear Wink of Stella

I'm also linking this card up at:
52CCT - April theme: foliage

Inspiration card by this week's Muse, Chris Blagrave


Monday 11 April 2016

Inspired by W&W 2 - 2 more cards

I created two more cards for the Winnie&Walter Share the Love Week Featuring Felicity by Pinkfresh Studio. On days 2 and 5, Kelly and Kate showed two cards using similar supplies and I was inspired by both. I remembered I had this fun BasicGrey paper (pb &j) and a stamp set by Echo Park featuring a house not unlike the one Kelly and Kate used.


For my first card, inspired by Kelly's creation, I really went out of my comfort zone, using not only stamps, inks and die cuts (normal), but also patterned paper, 4 different washi tapes (gasp) AND several rub ons (butterfly, BeYouTiful, flowers and sequins, all from the same Chic Tags set by Cloud 9) that I found hiding in a box. The You sentiment (Simon Says Stamp) was cut out a few times from BasicGrey pp and white cardstock and layered to create a more sturdy embellishment. The scallopped rectangle was cut using a die by SugarPea (part of the set that was included in the SOA Young at Heart collection). Creating this card was hard work, but I thoroughly enjoyed it and I'm very happy with how it turned out.

Challenges:
Creative With Stamps - 1 Butterfly
Stamping Sensations - One for the girls
Creative Card Crew - Die cut


My second card uses the same stamps and patterned paper, but is more within my comfort zone.


After stamping the houses and leaf (used as a tree here) in various inks, I die cut the Hello sentiment by W&W from my panel and mounted it on top of two more die cuts cut from white card stock and then inlaid it in my panel. A few die cut hearts (SSS), partly coloured by swiping my inkpad over them, a sentiment strip (Happy Every Day by SSS) and a few Studio Calico sequins finish off my card.

Challenges:
Sparkle & Shine - 27 Inspiration photo
ATCAS - 85 Inlaid die cut(s)


Inspired by W&W 1 - 2 cards

This weekend, I've been spending a good deal of my time in my craftroom. I wish my weekends were longer, since I had a few more ideas I wanted to work on... On the other hand, I'm grateful that DH is recovering well after his surgery, which took place 6 weeks ago after initially having been posponed for 2 weeks. Last week he started doing the morning walks with our dog Bernie again, which is a perfect arrangement for all three: DH enjoys the walks, I get more sleep and can be at my desk a little earlier, and Bernie loves walking with DH (also with me, though).

Anyway, after drooling over the inspiration at the Winnie & Walter blog for a week, when the DT were showing us how they combined W&W products with some Pinkfresh Studio Felicity supplies, it was time to get creative myself using their work for inspiration.

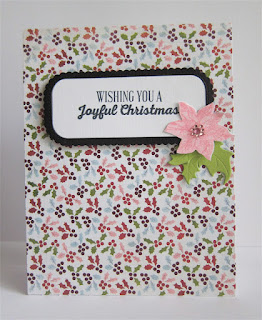
First up I have the following card to share, which was inspired by Lydia's card on day 3. I'm not good at clustering, but I loved Lydia's cluster against that floral background in black and white, so I decided to give it a go.


To mimick the effect of Lydia's die cut heart, I stamped the poinsettia in Memento rhubarb ink onto a piece of vellum and heat embossed the image using Hero Arts clear embossing powder. I coloured parts of the petals on the back of the vellum using a red Promarker. The holly (W&W Happy Christmas) was stamped in green and coloured in using a green Promarker. After fussy cutting the leaves, I clustered them behind my sentiment strip (sentiment from W&W Happy Christmas) and adhered this to my poinsettia. For my background panel, I created a mask and placed that on my card panel because I did not want the leaf image to shine through the vellum, and then stamped the 2 leaf stamps from the Happy Christmas set using black ink. Before mounting my panel using foam tape, I adhered a piece of (never before used) Kelly Purkey washi tape on the left edge of my base card. To finish things off, I adhered a few pearls from a multi-coloured set by Kaiserkraft from my stash.

Challenges:
CAS on Sunday - 80 Flowers
AAA Cards - 62 Anything goes


My second card was inspired by Heather's Hello card on day 5 of the inspiration week at the W&W blog. I loved the big die cut made out of patterned paper on top of this row of stripy patterns. I browsed my neglected collection of patterned paper and found this fun pattern of stripes and stars in one of the Christmas paper pads from a Dutch bargain store and decided to combine this with the Merry die by W&W to create a Christmas card.


After adhering the strip of paper and the red washi tape by Kelly Purkey, I decided I needed something more solid to ground my die cut, so I stamped one of the borders from the W&W Holiday trimmings set (included in the very first Stamp of Approval box) in black. To tie the sentiment in with the rest of my design, I die cut the sentiment again from a piece of red cardstock and adhered it in such a way so as to create a shadow effect. I mimicked Heather's wood veneer heart by die cutting a star from wood veneer paper and two more from black cardstock to create my own wood veneer embellishment and coloured my star using a red Promarker. All that was left to do then was to adhere a few red sequins from the Pretty Pink Posh classic Christmas mixes.

Challenges:
Sparkles Christmas - 63 CAS Christmas
Christmas Card Challenges - 19 Photo inspiration (theme always optional)
Dutch Card Lovers - 252 Use wood veneer / Gebruik houtfineer


Saturday 2 April 2016

Darnell's April Fool's Day Boo Boo Hop

Yesterday, the sweet Darnell of djkardkreations was hosting a blog hop for her followers where they could share their card creation boo boos. I didn't think I had anything to link up, but when I was lying in my bed last night, I suddenly thought of the card I had recently created. This morning, I had 15 minutes left to link up my card, so I added a note to my original post here to share my boo boo.

Since I don't want my followers to miss out on my boo boo, I'm sharing it again in this new post.

My card below started life as a perfect one-layer card, but before I added the frosting to the cake, I decided to run my card through my Cuttlebug to flatten it out...folded and with another piece of cardstock as a shim... Not a good idea... The edges of my shim were embossed on my front panel and the heat embossed sentiment left an imprint on the inside of my card. I felt so lucky that I managed to salvage my panel by die cutting it and layering it on top of a new card...


Check out the other entries of the Blog Hop here for more boo boos. Of course, if you have made any boo boos, I would love to hear about them...