Thursday, 31 August 2017

If life gives you lemons...

I just had to create one more card for the Gossip Column at Winnie & Walter's. It was another idea that had been singing in my head every since Taheerah published her post about summer fruits.


I started my card by blending some Tumbled glass DI on a panel of watercolour  cardstock. Next, I created a stencil from acetate using the Leaf Effect Cutaway die (W&W) and then blended Twisted citron through my stencil, making sure to move from the bottom left to the upper right to create a shadow effect on my 'lemons'. For the sentiment, I did a little stamp masking so that the text would read 'smile' instead of 'smiles' (from The Big, the Bold and Friends by W&W) and created the strip using Word and my printer. I created a 3-dimensional lemon by die cutting the leaf pattern from a scrap of vellum, coloured 5 of  these leaves using Copics,  stapled them together and folded them. I did trim off a bit at the ends to make them look rounder, more like a lemon.

Here's a close-up of the dimension of my vellum lemon. 


Challenges:

Taheerah's Gossip Column at W&W - No. 8 Summer fruits


I have just realised I also meant to link up my card in the following challenges:

Aud Sentiments -  #187 Thinking of you/Sympathy

SSS Wednesday - Anyting goes


You can do it!

I have a fun and quick card to share with you today.


The inspiration for this card came from this week's LIM challenge, which challenges us to use a real object on our cards, and the warm-up challenge of this year's SAF event at the PTI blog. There were several photographs and colour combos that appealed to me, but I settled on the black and white deliciousness of the following photograph.


It was the office/school/stationary supplies that triggered me to tear a sheet from one of my small notepads (I have one at my desk, one in my craft room and usually one in my handbag) fold it in half and add a few small staples. For my little note, I used stamps from the Blue Skies set by PTI, and I used one of the borders from PTI's Ombre Builders set to stamp a border to the left and right side of my cardbase.

Challenges:

PTI SAF 2017 - Warm-up challenge


LIM - #343 Use a real object


SSS Monday - School or study related


SSS Wednesday - Anything goes

Today also marks the start of a new episode 
so I'm also sharing my card at her blog.


Sweet watermelon ice

After posting a couple of Christmas cards in the last few days, I'm switching back to summer, which is my favourite season of the year.


I had so much fun creating this card. It started with an idea that popped into my head as soon as I saw the most recent installment of Taheerah's Gossip Column at the Winnie &Walter blog.

I created a stencil from cardstock using the tag die from Essentials: Noelle Cutaways (W&W) and temporarily adhered this to a panel of watercolour cardstock. Before applying my ink-coloured translucent embossing paste through the stencil, I dotted some seeds using a permanent black marker.

After the embossing paste had dried, I decided I wanted a smoother look, so I die cut my watermelon ice lolly as well as a second cardstock template and added another layer of transluscent embossing paste, without colouring it this time. I used the small, narrow tag die from the same set to die cut a stick from white woodgrain cardstock and added a bit of colour using antique linen distress ink that was still on my ink blending tool. I found the smooshed background panel in my stack of background panels and thought it was just perfect for the look I was after. I repeatedly stamped the word 'sweet' (from The Big, the Bold and Friends) in two shades of pink (Altenew) and combined it with the word 'wishes' from the The Big, the Bold and Merry to create my sentiment strip. I love that you can mix and match the sentiments from the various stamp sets.

I popped up my ice lolly and sentiment strip using foam tape and adhered my panel to a soft pink cardbase (SSS).

Challenges: 

Taheerah's Gossip Column at W&W - No. 8 Summer Fruits


SOS - #318 Favourite season (Summer of course!)

ATSM - #257 Make your mark


SSS Wednesday - Anything goes


Wednesday, 30 August 2017

Vintage snowman

I was determined to play along with the lovely Jingle Belles this fortnight, where Lauren and Stef are challenging us to create a vintage Christmas card, which they do once a year. When I think of vintage cards, my first thought is of usually of multiple layers, but I figured I would try my hand at a one-layer vintage Christmas card this year.


If you look closely, you will see that I ended up with two layers, but that's because I started my card with a panel of watercolour cardstock. I created my background using the smooshing technique with distress oxide inks (Antique linen and a little Vintage photo). After my panel was dry, I stamped my snowman (Christmas Blueprint, Stampers Anonymous, which has been patiently waiting in my stash to be used) using Vintage photo DOI and carefully sprayed a little water to let the distress ink spread just a little. I tried bleaching out some of the ink on the snowman's body with the help of a waterbrush and a paper towel, and then added a little colour to the hat, nose, scarf and shaded body areas using Inktense pencils and a very small paint brush. I inked the edges of my cardbase with some vintage photo DOI before adherin my panel using glossy accents. When I tried to remove a few shiny spots from the glossy accents using my sand eraser, I also remove a little of the ink, so I repeated this in several spots to make it look intentional. After all, it adds to the distressed look.

This was such a fun and fairly quick card to make, so I think I will go and create a set, using the other three images from the stamp set as well. 

Challenges:

Jingle Belles - Spirits of Christmas past

HLS Christmas - Anything goes


A Snowflakes Promise - #43 Anything Christmas goes

CHNC -  #348 Anything Christmas goes (optional: sth. old)

CHNC Extra - Always Anything Christmas goes

The Holly and Ivy - #13 Anything Christmas goes


MCV83 Season's tweetings

I'm back with my fourth and final card for this month's Christmas Muse Club challenge.


For this card, I focused on the penguins and igloo of Cornelia's fourth card.


Instead of adding a blue circle, I stamped my igloo onto a piece of vellum that I had coloured using alcohol inks a few month's ago. I heat-embossed the image (Season's Tweetings, Winnie & Walter) in pearl silver embossing powder (Ranger) and then fussy cut the image. The penguins are from an old Marianne Design stamp set and were coloured using Promarkers. After adhering my igloo and white heat-embossed sentiment onto my panel, I popped up the penguins using foam tape.

Challenges:

MCV83 - Inspired by Cornelia

Winter Wonderland - Embossing 

Penny Black and More - All creatures great and small

Tuesday, 29 August 2017

MCV83 - Cookies anyone?

Today, I'm back with my third card for this month's Muse Christmas challenge club, where our muse Cornelia has given us 4 cards for inspiration.


For my card, I focused on the cookies theme, kraft cardstock and pops of white and red of Cornelia's first card.


I started by punching out several circles from Neenah desert storm cardstock and inked the edges using Antique linen distress ink and a blending tool. The antlers for the reindeer cookie were die cut from brown cardstock and given a coat of glossy accents to mimick a chocolate decoration. The eyes were created using white enamel accents and the nose was first stamped in red with a small circle stamp for the right placement before adding red stickles and finishing off with a dot of glossy accents. The other cookies were decorated using stamps from various stamp sets (by Clearly Besotted, Paper Smooches and Winnie & Walter) and heat-embossing in white.

Challenges:

MCV83 - Inspired by Cornelia

Winter Wonderland - Embossing (I used heat-embossing)

Christmas Card Throwdown - Embossing technique


My Time to Craft - #353 Krafty

ABC Christmas - PQR - I went with R for Red


Sunday, 27 August 2017

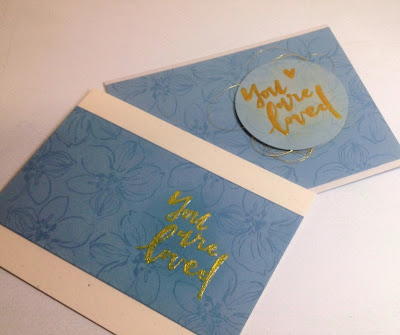
You are loved

The colour scheme of todays cards was inspired by a challenge I wanted to participate in, but sadly the linky had already closed by the time I had finished my card. It's not the first time that has happened to me, and I'm pretty sure it won't be the last time either.


I started with testing my tone on tone stamping on a smaller scrap to see if I liked it, which I did, so I decided to create this strip into a card as well, and then I went on to stamp the larger panel in simplar fashion, using one of the blooms from the Wild hibiscus stamp set by Altenew. The sentiment and heart are from the You are enough set by Concord & 9th. I adhered my panel to a card base out of soft grey cardstock.

Below is the first stamped strip, which I adhered onto a card base of Rustic cream cardstock by PTI.


And here they are together:


I'm entering my first card into the following challenges:

Where Creativity meets C9 -  #12 Anything goes


Tic Tac Toe - #12, I went with the bottom horizonal row


MCV83 - Take 2

I am back with my second card for this month's Muse Christmas challenge, where Cornelia has given us 4 cards as inspiration.


This time I focused on Cornelia's third card, at the bottom left. I focused on the wreath with ornaments in different colours, a sentiment underneath and some additional stamping inside the wreath.


All the images are from the Wonderful wreath set (part of the Lovely Notes SOA collection by Catherine Pooler Designs). The sentiment is from an older set by CC Designs, Handy Christmas Greetings. I bought the set years ago because I loved the combination of handwriting and typed text, but wasn't sure how to get a straight impression with these red rubber stamps. So I never got around to cutting up the large block of stamps, until last week. Moreover, with the help of my Misti and a grid transparency, getting the sentiment to line up straight was a breeze.


I started my first card using a previously cut panel, which turned out to be slightly narrower than an A2-sized card, so I mounted it onto a red cardbase. I did feel the design would also work for a one-layer card, and went on to create 10 of those. A perfect way to try and reach my goal of 80 Christmas cards by the end of October.


Challenges:
MCV83 - Inspired by Cornelia

CCAYR - Use yellow on your Christmas card

CHNC - #348 AG Christmas (optional: use sth. old)

CHNC Extra - Always AG Christmas


Saturday, 26 August 2017

MCV83 - Take 1a/1b

This month's Christmas muse, Cornelia, did not create 1 but 4 cards to inspire us. The idea is to create one card for each of the inspiration pieces. I am hoping to share 4 cards in the next couple of days.

Here is my first one, or actually two, since I created two versions of my card.


For the card above, I focused on the graphic fragmented stag, the stripes and the primary colours of Cornelia's second card at the top right.


I made the front of my side-folding card a little narrower than the back and adhered a strip of striped paper to the right edge of the back panel. I had originally intended to stamp the lined pattern behind the aperture that I had die cut in a separate panel using the Prize Stag die (Essentials by Ellen), but it did not turn out quite right, so I stamped the pattern (using the star stamp from Winnie & Walter's True stamp set) again on the actual die cut and inlaid it into the aperture. To finish off, I stamped a sentiment from the Season's tweetings stamp set (Winnie & Walter) and adhered a red gem for a little extra whimsy.

I created a second card using the same idea, but for this one, I adhered two strips of striped paper along the edges of my top-folding card and then added my top panel in the middle. Instead of the black and white stag, I inlaid the stag from metallic red paper that I was left over from a previous project and was stored with my die. As always, the shine is hard to capture in a photograph.


I'm entering my cards into the following challenges:

MCV83 - Inspired by Cornelia

Christmas at Sweet Stampin' - Anything Christmas goes

Rudolph Days at Maureen's blog

Sparkles Christmas - #79 A festive sentiment


Friday, 25 August 2017

A perfectly CAS holiday

Today, I have a one-layer Christmas card for you using non-holiday stamps.


Earlier this week, Susan Raihala challenged the followers of her blog, Simplicity, to create a holiday card using non-holiday stamps, and I had just the right stamp to have a go.

The fern stamp (Optimism leaf by Sheena Douglass) arrived earlier this month as one of the items in a surprise 'grab bag' that I had ordered from a UK-based craft shop. When I first opened the big envelope, I thought I had received someone else's order, since I would never have ordered any neon green stickles lol, but the surprise package also contained this pretty rubber stamp.
I inked the stamp up with 2 shades of green (Forest Glades and Evergreen by Altenew) and then added my baubles using circle stamps from a neglected stamp set by Hero Arts/BasicGrey, Best of the Best) in Candied apple Distress oxide ink. I used a red water-based marker and a T-ruler to add my strings. To finish things off, I rounded the bottom corners with my 1/4" corner chomper.

Challenges:
LIM - #342 Perfect holiday


CAS on Friday - #115 One-layer wonder

ATSM - #256 Anything goes


MFT CC Rainbow background

For my last card of this series, I heat-embossed this wonderful MFT background stamp in white embossing powder onto a panel of watercolour cardstock, added colour using my Zig markers and then spritzed with a lot of water. I die cut the MFT Sending word die from my panel and then offset it with two layers of black die cut sentiments underneath. I messed up my stamping and tried to fix this by adding a white strip on top of my stamped sentiment. I'm not entirely happy with the way this looks, so maybe I'll try to fix it (again) with a blue strip and a white heat embossed sentiment. Of course, the recipient may like the card just as much in its current state.


This card fits the theme of the following MFT challenges:

I'm also linking up my card at:
Stamping Sensations - Anything goes (with stamping)
Seize the Birthday - Anything Birthday goes
MAWTT - #52 Things beginning with B - I went with birthday & bold colours


MFT CC LLama Love

For the two cards below, I started with a single panel of Neenah desert storm cardstock and distress oxide inks (antique linen, fossilized amber, spiced marmelade), for a masculine look. The cards are not what I set out to do. I changed my mind several times along the way, but I love how they turned out in the end.


For my first card, I combined the following MFT Camp Create challenges:
Bonus day - Awesome ombre

I'm also linking up my card at:
Penny Black and More - All creatures great and small
Stamping Sensations - Anything goes (with stamping)
Creative with Stamps - #17 Boys to men
Seize the Birthday - Anything Birthday goes


For my second card, I turnded the second half of my inked panel upside down compared to my first card, for a different look, and die cut the MFT hello word die 3 times. Instead of piecing the inner parts of the 'e' and 'o' back, I decided to stamp a few of the lama heads behind the apertures of the 'o'. So fun!


This card fits into the following MFT Camp Create challenges:
Bonus day - Awesome ombre

I'm also linking up my card at:
Creative with Stamps - #17 Boys to men