Wednesday, 29 June 2016

Muse: ChristmasVisions 51

I'm thrilled to be this week's Guest Muse at the Muse: ChristmasVisions blog.


For my inspiration card, I decided to have a play with lots (if not all) of the tiny stamps from a NBUS stamp set by Joy!Crafts. I started by die cutting a circle to create a guide for placing my stamps in the upper part of the circle and then picked them up using my Fiskars stamp press. After stamping them in Versamark and heat embossing them in white embossing powder (SSS), I repeated the process for a few more cards (light bulb moment) and then rearranged some of the stamps for the lower part of the circle. I then used the negative of my die cut as a mask for my blending. To finish off, I stamped the bow using my NBUS glue pad and added red glitter. The sentiment on the die cut vellum sentiment banner (SSS) was created in the same way and the banner was then popped up using Kool Tak clear foam adhesive behind the sentiment.

I do hope you are inspired and want to play along. Maybe you could have a look what you can do with all those tiny stamps that are in your stamp sets? Please hop over to the MCV blog for the challenge details. I cannot wait to see what you create.

I'm also linking this card up at:
Jingle Belles (use a clear element)
Stamplorations CAS card (anything CAS with the optional colour of blue)
Stamplorations Theme and Sketch challenge (I went with the theme: Stamps and celebration)
SSS Wednesday (Anything goes).


Muse: ChristmasVisions 50

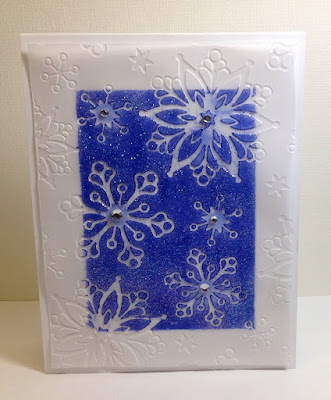
I could not resist playing along with this week's ChristmasVisions muse, Eliz Stewart, who gave us a glittery white and blue snowflake card to inspire us.


I used several elements from her card: the colours, glitter and snowflake theme, but instead of using inlaid die cuts and a small vellum circle, I used a full-sized vellum panel and a snowflake embossing folder. I had intended to use a blue inked panel behind my vellum, but I did not like the look of this, so I decided to mask off the sides of my vellym panel and swiped my new Blueprint sketch mini distress ink pad over the backside of my vellum panel, sprinkled iridescent sparkle embossing power (JudiKins) over it and heat embossed. I adhered my panel to my cardbase using double-sided tape and added a few rhinestones in the centre of the snowflakes. Wish you could see the sparkle in real life.

Here is the card by Eliz that inspired my card:


Challenges:
Muse: ChristmasVisions 50 - Inspiration by Eliz, shown above
Jingle Belles - It came upon a midnight CLEAR (use a clear element)
June Rudolph Days - Anything Chrismas goes
STAMPlorations CAS challenge - Anything CAS goes with optional colour: blue


Wednesday, 22 June 2016

Muse: ChristmasVisions 49

Just popping in with my card for this week's challenge, where Muse Cornelia gave us some fun inspiration using trees made out of a paint chip.


I had a digital image with fun trees printed out and ready to be coloured, but I ran out of time. And then this morning, I remembered the fun trees and critters by Pretty Pink Posh that I had previously coloured using Promarkers and fussy cut, tucked away with the stamp set and ready to be used on a card. All I needed to do was heat emboss the woodgrain stamp by Winnie & Walter in white ep (SSS) onto vellum and fussy cut it for my background. To add a little more interest I used a NBUS SSS die to die cut a snowy landscape. I popped this panel up using foam tape and tucked my images behind it. To finish off, I stamped the sentiment onto a strip of CS using archival jet black ink and popped this up using foam tape. Another Christmas card done. Yay!

Here is Cornelia's card:


Isn't it fun?

Challenges:
Muse: ChristmasVisions 49 - Inspiration by Cornelia
ATSM - 199 CAS
Jingle Belles - It came upon a midnight CLEAR
Merry Monday - 210 Peace, love and joy
SSS Wednesday - Animal magic


Perfect Distress

For today's card, I combined homework for the Creative Chemistry 101 online card class with a few fun challenges in blogland.


Wish you could see the shimmer of the perfect pearls. Here's a close-up:


I started by creating a perfect distress panel using some of my new distress inks (kit #15 plus Twisted citron from kit #14) and Perfect pearls. After that I die cut the oval (Die'sire) and one of the Wild Garden dies by Julie Ebersole (Essentials by Ellen). I cut the garden die again from a panel that I had heat-embossed using Ranger Liquid Platinum embossing powder and inlaid all of my elements onto another oval panel from white cardstock. I stamped the sentiment (from Winnie & Walter's Happiest of Holidays by Evelin T. Designs) in black archival and mounted my panel onto fog cardstock (SSS). To finish off, I added a few sequins from the Muted Metals mix from Lucy's little things.

Challenges:
CAS Mix Up June - Stamping and die cuts + choice (smooshing, perfect pearls, heat embossing)
Winnie & Walter - Sharing the love featuring Essentials by Ellen - day 2 Sentimental
Taheera's rainbow challenge at the Winnie & Walter blog
HLS Anything goes with dies - June anything goes
Virginia's View - 22 All about colours (Summer)


Monday, 20 June 2016

Reverse floral background

I seem to be in a habit of creating sets of two cards these days, but I don't mind. I love that the creative juices are flowing and am enjoying it while it lasts. The light was fading when I took this picture, so it looks a bit darker than in real life.


I had created another floral panel based on the inspiration photo at the Uniko blog. This time, I stamped my floral images (SugarPea Designs set from the SOA Beautiful World collection) in Versamark onto watercolour cardstock. To determine the placement of my watercoloured circles, I stamped the images through a stencil (Ring cluster by Simon Says Stamp) and heat embossed in white embossing powder (SSS). I worked in smaller sections, watercolouring a batch of circles through the stencil, before moving the stencil to a different part of my panel and stamping and heat embossing the next batch. After my panel was done, I removed the embossing using a craft iron and paper towel. I cut my frame from SSS grey cardstock using the 5.5 x 4.25 inch die from the Avery Elle custom panels die set and the scalloped die from the SugarPea Designs die set from the previous SOA collection. Before adhering the frame to my stamped panel, I heat embossed one of the sentiments from the SP stamp set in white onto a strip of vellum and wrapped it around my panel.
After mounting my panels onto a white cardbase, I added a few sequins from the Muted Metal mix from Lucy's little things.

Challenges:
Uniko - 33 Inspiration photo
SugarPea Designs - Mix it up #3 (my flower circles remind me of the fun umbrellas in the inspiration photo)
LIM - 280 Faux bleach (although the technique I used for my card was inspired by the LIM challenge, I'm afraid that my card turned out to be somewhat lacking in the white space department)
Virginia's View - 22 All about colours (Summer)


Floral background

When I saw the inspiration image at the Uniko blog, I just had to play along. Love the colours and the pattern.


Although I wanted to recreate the white outlines with the coloured, wonky circles, I decided to start by simply stamping my flowers (by SugarPea, from the SOA Beautiful World collection) using some of my new inks (Studio Calico pigment inks, Brilliance gold) and Pool dye ink by Hero Arts.. I also used the coral SC pigment ink to add colour to a scrap of cardstock for die cutting the You sentiment (by CAS-ual Fridays, from the same SOA collection). I cut my stamped panel a little smaller (CAS-ual Fridays, from the same SOA collection) and adhered it to my grey cardbase (Simon Says Stamp). I started by stamping the birthday sentiment in the same grey ink I had used on my background, but decided it did not stand out enough, so I added Ranger Liquid Platinum embossing powder over the still wet pigment ink and heat set this. Before adhering my die cut, I went over it using my Spectrum Noir glitter brush. To finish off, I adhered a few Studio Calico sequins to the hearts of the small gold flowers.

Challenges:
Uniko - 33 Photo inspiration (see below for the graphic)
Seize the Birthday - Anything goes
Penny Black and More - Flower power
Allsorts - 368 How does your garden grow
Virginia's View - 22 All about colours (Summer)


Saturday, 18 June 2016

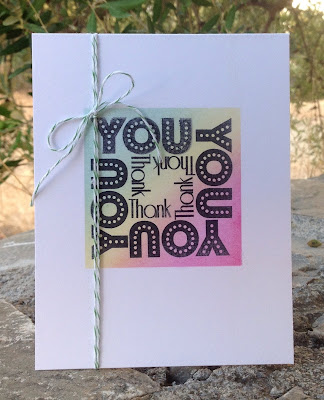
Thank YOU

Once I had figured out the placement of my sentiment box (see yesterday's post), it was very easy to make a second card using the same stamp set by CAS-ual Fridays from the SOA Beautiful World collection. This time, I masked the outside of my box and blended my colours (cracked pistachio, squeezed lemonade, picked raspberry) using my new Clarity stencil brushes, which made the job really easy. 


To finish the card off, I created a small opening in the fold of the card to feed some baker's twine (Martha Stewart) through, after which I could tie my bow.

Challenges:
CAS-ual Fridays - CFC150 Thanks with twine
ATCAS - Aloha
Inkspirational - 111 Masking
Virginia's View - 22 All about colours (Summer)


Friday, 17 June 2016

Birthday splatters

I squeezed in a little crafty time today to create a card for a number of fun challenges.


Ingredients & tools:
White stamping card (300 gsm), Sheena Douglas
All about you stamp set, CAS-Ual Fridays, part of the SOA Beautiful World collection
Archival black ink
Splatters stencil, Tim Holtz
Distress inks: picked raspberry, squeezed lemonade, cracked pistachio
Clarity stencil brushes (awesome!)
Paintbrush (to create the extra splatters)

Challenges:
Less is More - 280 One-layer card, theme: splatters
Virginia's View - #22 All about colour (Summer)
STAMPlorations - Theme & sketch (only used theme: Stamps & celebration)
Seize the Birthday - Anything goes
One-layer Simplicity - OLS Stencil


Tuesday, 14 June 2016

Muse: ChristmasVisions 48

When I saw the hand-painted penguins from this week's muse, Chriss Blagrave, I went looking for penguin stamps on the Internet. I was looking for digital/cling/rubber stamps, but I found quite a few images of postage stamps instead. And when I saw these chinstrap penguins on a New Zealand postage stamp, I decided to take the plunge and have a go at hand-drawing and water colouring these penguins for this week's challenge.


Last year, I bought a set of Winsor & Newton water colour paints, intending to learn how to paint the way Anna Mason does, but with all of the health issues DH and I were having, I've only used the paints on a few backgrounds. Recently, I watched a video on Anna Mason's blog and was told by the speaker, Josh Kaufman, that we are procrastinating: we say we want to learn something new, but we're coming up with all kinds of excuses to postpone getting started. This message stuck with me, and I'm trying to stop procrastinating. So when I started my little project, I told myself I was going to use this as an exercise and not worry about the outcome. I also took Anna's advice to take measurements to get the drawing onto paper. After drawing the first penguin I got impatient and drew the other penguins without measuring everything, but I'm very pleased with how it turned out. Looking at the end result, I'm amazed that I created this, and in just a couple of hours. I think deciding on the sentiment was the hardest part lol. In the end I decided on a combination of sentiments from a set by Simon Says Stamp (Ornaments).

And here's a picture of Chriss's wonderful inspiration card:


Challenges:
Muse: ChristmasVisions 48
AAA Cards - 66 Watercolours
STAMPlorations June CAS - Anything goes (optional colour: blue)
The Glory of Christmas - 86 No patterened paper
Tuesday Throwdown - 298 Watercolor


Saturday, 11 June 2016

A purple Christmas

I thought I would pop in with a purple Christmas card for a couple of challenges. The colour was inspired by this week's challenge prompt at Less is More. Although I did not manage to finish my card before the linky at LIM closed, I do have another Christmas card for my pile.


The theme for my card came from this fortnight's prompt over at Jingle Belles, snow(men), while the layout is based on this week's 52CCT sketch.

I started with the embossed vellum panel from my box of unfinished panels. I die cut the curve using an Avery Elle die (Custom panels) and adhered it to my card base with double-sided tape (debossed side up). On a separate piece of Neenah solar white cardstock I repeatedly stamped a snowflake border (CAS-ual Fridays, part of SOA Holiday Magic collection) in Versamark and heat-embossed in Hero Arts clear embossing powder. I then blended distress inks to create an ombre background (milled lavender, dusty concord and a little seedless preserves). I trimmed the panel and mounted it onto my card base using foam tape. The sentiment (also from the SOA collection) was heat-embossed in white (SSS) onto a snippet of black cardstock. When I opened one of my drawers to look for a way to embellish my card, my eye fell on these cute brads from the Eyelet Outlet, which I've had for a long time but never used until now. I had to snip off the brad legs (or whatever they are called) to make it fit on my banner and then simply adhered it using multi medium matte. Finally, I added a few rhinestones for some festive sparkle.

Challenges:
52CCT - Sketch (see below)
Jingle Belles - Frosty the Snowman
HLS Mixed Media - Texture (stamps, distress ink, heat embossing, drie embossing)
Christmas Card Challenges - 27 Anything Christmas goes (optional: inspiration photo)
Crimbo Crackers - 108 Anything Christmas goes


Wednesday, 8 June 2016

Creative Chemistry - homework 1/2

Another quick post with more homework, featuring the Brushless Watercolour technique.
I was not entirely happy with my first attempt so I repeated the process, the result of which can be seen on my tag.


I then decided to spritz my first attempt with water to achieve a softer look and add a butterfly, and I really love how it turned out. I wrapped some twine around my panel, mounted it onto a piece of Ranger kraft cardstock and adhered this to my card base, after stamping my sentiment in Memento rich cocoa ink. The stamps are from a set by Sheena Douglas (Silhouette grasses) and Stampers Anonymous (Tim Holtz H2-1340; I only stamped the smaller of the 2 butterflies). The sentiment is from a Hero Arts set (It's your day).

Challenges:
LIM - 279 Purple
Penny Black and More - Flower power
Allsorts - 366 The great outdoors
AAA Cards - 66 Watercolour


Tuesday, 7 June 2016

Creative Chemistry - homework 1

Online Card Classes have decided to launch a summer of creative chemistry, revisiting Tim Holtz's classes Creative Chemistry 101 and 102 and following up with the brand new 103.

I purchased the first class many moons ago but never got around to play, so this is a great incentive to get crafty ... and inky.

The 2 tags below are part of the homework for week 1 using 2 different techniques: Blended Spritz & Flick (left tag) and Wrinkle-Free Distress (right tag).


Don't know why it took me so long, since these techniques are so much fun and fairly quick to do. I'm hoping I will be able to keep up this time. Thanks for visiting!


Wednesday, 1 June 2016

MCV46 Take 2

While I had my supplies out for the masking part of my previous card, I decided to create a second panel using different greens. After the sponging, I added a piece of cling film that I had spritzed with some water. The cardstock I used was not really suitable for this technique, so I took the cling film off after some 30 seconds, but it did leave a fun effect even though the paper had warped a little. This time I used a few shiny stars from my stash and added red stickles to the reindeer's nose.


And a close-up:


Again, here is Stephanie's card that inspired mine:


Challenges:
MCV46 - Inspiration card by Stephanie
Jingle Belles - Banishing the holiday blues
SSS Wednesday challenge - Anything goes
CAS on Sunday - 84 Sparkle